Are you tired of looking at your old kitchen cupboards? Maybe you've been wanting to breathe new life into your kitchen but can't afford a full renovation. Painting kitchen cabinets is a cost-effective way to transform your entire kitchen and give it a fresh, updated appearance.
Having painted dozens of kitchen cabinets over the years, The Spraying Team have learned what works and what doesn't. This step by step guide will walk you through the entire process, from preparation to the finishing touches, ensuring you get a beautiful finish that lasts.

Before jumping into the painting process, gather all the necessary supplies:

The first step in how to paint kitchen cabinets is to remove all the doors, drawer fronts, and hardware. This will make the job much easier and result in a more professional finish.
Using a screwdriver, carefully remove all the doors from the cabinets and take off the hinges. Place all the hardware in labeled bags so you know exactly where everything goes when it's time to reassemble. Taking photos before disassembly can also help with remembering the original arrangement.
Remove all the drawers completely if possible. If not, you can mask off the inside of the drawers with painter's tape. Pay special attention to drawer fronts as these will need thorough preparation like the doors.

Kitchen cupboards accumulate grease, food particles, and general grime over time. For the paint to stick properly, you need to start with a clean surface.
Give your cabinets a good clean with a degreasing cleaner. Pay special attention to areas near the stove and around handles where grease and dirt tend to collect. After cleaning, wipe all surfaces with a damp cloth to remove any cleaning residue, then allow them to dry completely.
Water damage can sometimes be found when cleaning old kitchen cabinets, so check for any soft or damaged areas that might need repairs.

Examine all the cabinet doors and frames for damage. Use wood filler to repair any holes, cracks, or dents in the wood. Once the wood filler is completely dry, sand it down until it's flush with the surface.
Next, sand all the surfaces you plan to paint. This creates a slightly rough surface that helps the primer and paint stick better. For laminate or previously painted surfaces, use a medium-grit sandpaper. For bare wood, start with a medium-grit and finish with a fine-grit sandpaper for a smooth finish.
After sanding, wipe away all the dust with a lint free cloth. Any dust left on the surface can create bumps in your final paint job.

Primer is essential for kitchen cupboards as it helps the paint stick and provides a uniform base for your colour. It's especially important if you're painting over dark wood or changing colours dramatically.
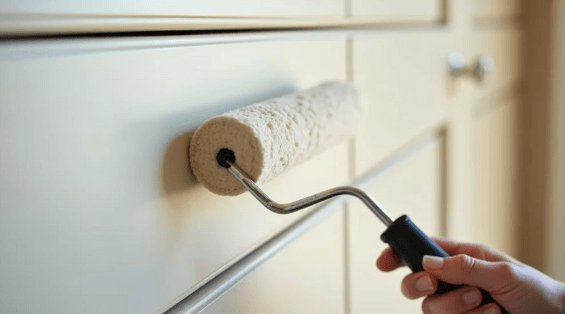
The best paint jobs always start with proper priming. Using a brush for the inside corners and detailed areas, and a roller or paint sprayer for flat surfaces, apply an even coat of primer to all surfaces. Make sure to follow the wood grain when applying primer with even strokes.
Allow the primer to dry completely according to the manufacturer's instructions. This usually takes at least 24 hours. The drying time for primer is crucial - don't rush this step. Once dry, lightly sand the primed surface with fine-grit sandpaper to ensure it's completely smooth. Wipe away any dust with a lint free cloth before proceeding.

Now for the exciting part of painting kitchen cupboards, applying the colour! Choose a high-quality, hard-wearing paint specifically designed for kitchen cabinets. These paints are more durable and can withstand the heat, moisture, and wear that kitchen cabinets experience.
For the first coat, use a brush to paint the inside corners and any detailed areas. Then use a roller or paint sprayer for flat surfaces. Apply the paint in thin, even strokes following the wood grain. Avoid overloading your brush as this can cause drips and an uneven finish.
Let the first coat dry completely as per the paint manufacturer's instructions. This typically takes at least 24 hours. Paint dries at different rates depending on the room temperature and humidity, so always check before proceeding.

Once the first coat is fully dry, lightly sand the surface with fine-grit sandpaper. This removes any imperfections and helps the second coat adhere better. Wipe away all dust with a lint free cloth before applying the second coat.
Apply the second coat using the same technique as the first. Make sure to use smooth, even strokes for the best finish. One coat is rarely enough for a professional look, so don't be tempted to skip the second coat. If necessary (depending on the colour change and coverage), apply a third coat following the same process.
Patience is crucial at this stage of painting your kitchen cabinets. Allow the paint to dry and cure completely before reassembling your cabinets. While the paint might feel dry to the touch within hours, it takes much longer to cure properly.
Most cabinet paints need at least 24-48 hours of drying time between coats, but full curing can take up to a week. During this time, avoid touching the painted surfaces as much as possible. The longer you can wait before reinstalling the doors and hardware, the harder and more durable your paint job will be.
Paint dries from the outside in, so while it may feel dry on the surface, it could still be wet underneath. If you rush this step, your cabinets might stick when closed or get damaged easily.
Once the paint is fully dry and cured, it's time to put everything back together. Using your labeled bags and photos as guides, reattach all the hinges and hardware to the doors and reinstall them on the cabinets.
Take your time with this step to avoid scratching or damaging your newly painted surfaces. If you're installing new hardware, now is the time to do it.

When painting your kitchen cabinets, don't forget about the walls and surrounding areas. If you're going for a complete kitchen transformation, consider repainting the walls to complement your newly painted cabinets—and if you're wondering, can you paint high gloss kitchen cupboards, the answer is yes, with the right preparation.
Cover any appliances with dust sheets to protect them from paint splatters. Paint kitchen walls after completing the cabinets to ensure a coordinated look. Use painter's tape to create clean lines where the cabinets meet the walls.

To keep your freshly painted cabinets looking beautiful for years to come, avoid using harsh cleaning products that can damage the paint. Instead, use a gentle cleaner and soft cloth for regular cleaning.
For the first few weeks after painting your kitchen cabinets, be extra gentle with your cabinetry as the paint continues to harden. Avoid slamming doors or drawers, and try not to scratch the surface with heavy pots or utensils.

Painting your kitchen cabinets is a rewarding job that can completely transform your entire kitchen at a fraction of the cost of a full replacement. With proper preparation, quality materials, and attention to detail including knowing which paint is best for kitchen cabinets you can achieve professional-looking results that will last for years.
If painting kitchen cupboards seems like too big a job to tackle yourself, The Spraying Team offers professional cabinet painting services. Our experienced team uses high-quality, durable paints and professional paint sprayer equipment to give your kitchen cabinets a flawless, factory-like finish. Contact us today for a free quote and take the first step towards your dream kitchen!
By following this step by step guide to painting kitchen cabinets, you can give your old kitchen a new lease of life and create a beautiful space you'll love spending time in. Happy painting!